กำลังเจอปัญหาลง Windows 11 ไม่ได้ เพราะคอมพิวเตอร์ฟ้องว่า “This PC can't run Windows 11” เนื่องจากไม่มี TPM 2.0 หรือไม่รองรับ Secure Boot ใช่ไหมครับ? ปัญหาสุดคลาสสิกนี้ทำให้หลายคนที่มีคอมพิวเตอร์เครื่องเก่งต้องพับโปรเจกต์อัปเกรดไปอย่างน่าเสียดาย
แต่วันนี้ NONGIT.COM มีข่าวดีมาบอกครับ! เราสามารถแก้ปัญหานี้ได้ง่ายๆ ด้วยโปรแกรมฟรีที่ชื่อว่า Rufus ซึ่งจะช่วยสร้าง USB สำหรับลง Windows 11 แบบพิเศษ ที่สามารถข้ามการตรวจสอบเจ้าปัญหานี้ไปได้เลย ทำให้คอมพิวเตอร์เครื่องเดิมของคุณได้ไปต่อกับระบบปฏิบัติการใหม่ล่าสุดได้สบายๆ ครับ
แล้ว TPM 2.0 กับ Secure Boot มันคืออะไร?
ก่อนจะไปเริ่มทำ ขออธิบายสั้นๆ แบบเข้าใจง่ายนะครับ
- TPM 2.0 (Trusted Platform Module): เป็นชิปความปลอดภัยบนเมนบอร์ด ใช้เก็บข้อมูลสำคัญต่างๆ เช่น รหัสผ่าน, กุญแจเข้ารหัส เพื่อให้คอมพิวเตอร์ของเราปลอดภัยมากขึ้น
- Secure Boot: เป็นฟีเจอร์ที่ป้องกันไม่ให้โปรแกรมไม่พึงประสงค์ (เช่น มัลแวร์) แอบทำงานตอนเราเปิดเครื่องคอมพิวเตอร์
ทั้งสองอย่างนี้เป็นฟีเจอร์ที่ดีครับ แต่คอมพิวเตอร์หลายรุ่นที่ออกมาก่อนปี 2017-2018 อาจจะยังไม่มี ทำให้ติดตั้ง Windows 11 โดยตรงไม่ได้นั่นเอง ซึ่งหากคอมพิวเตอร์ของคุณเป็นรุ่นใหม่ที่รองรับอยู่แล้ว สามารถทำตาม วิธีลง Windows 11 ตามขั้นตอนปกติได้เลยครับ แต่สำหรับใครที่ติดปัญหา เรามาดูวิธีแก้กันต่อเลย
ต้องเตรียมอะไรบ้าง?
เตรียมของแค่ 3 อย่างนี้ก็พร้อมลุยแล้วครับ
- USB Flash Drive: ขนาด 8GB ขึ้นไป (แนะนำ 16GB) และต้องไม่มีข้อมูลสำคัญนะครับ เพราะทุกอย่างจะถูกลบ!
- ไฟล์ Windows 11 ISO: หากยังไม่มี สามารถดู วิธีดาวน์โหลด Windows 11 จากบทความของเราได้เลยครับ
- โปรแกรม Rufus: เป็นพระเอกของงานนี้ ดาวน์โหลดเวอร์ชันล่าสุดได้จากเว็บไซต์ทางการ (ดาวน์โหลดที่นี่)
Step-by-Step: สร้าง USB แก้ปัญหาลง Windows 11 ไม่มี TPM
มาถึงขั้นตอนสำคัญแล้วครับ ทำตามไปทีละขั้นตอนได้เลย รับรองว่าง่ายมากๆ โดยปกติแล้วต้องไปแก้ใน sources ที่อยู่ใน usb หลังจากทำเสร็จ
ขั้นตอนที่ 1: เปิดโปรแกรม Rufus และตั้งค่าเบื้องต้น
- เสียบ USB Flash Drive เข้ากับคอมพิวเตอร์
- เปิดโปรแกรม Rufus ขึ้นมา (ไม่ต้องติดตั้ง)
- ที่ช่อง Device ให้เลือก USB Flash Drive ของเรา (ถ้าเสียบอันเดียว โปรแกรมมักจะเลือกให้เอง)
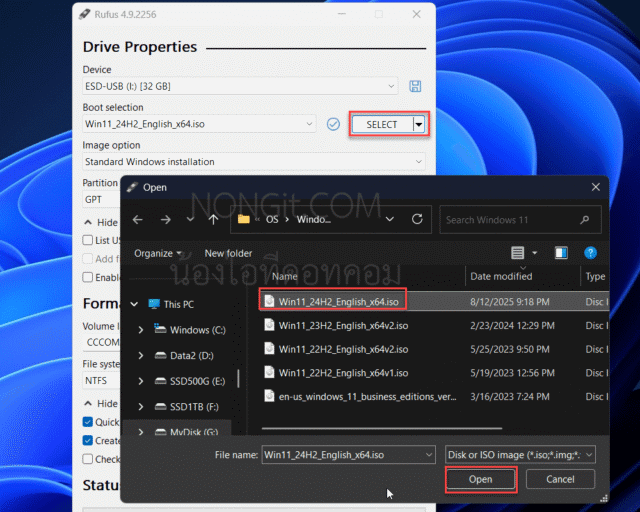
ขั้นตอนที่ 2: เลือกไฟล์ Windows 11 ISO
- ที่ช่อง Boot selection ให้กดปุ่ม SELECT
- จากนั้นไปเลือกไฟล์
Windows.isoที่เราดาวน์โหลดเตรียมไว้ครับ - ในช่อง Image option ให้เลือกเป็น
Standard Windows installationได้เลยครับ
ขั้นตอนที่ 3: ตั้งค่า Partition และกด START
- Partition scheme: เลือกเป็น GPT
- Target system: เลือกเป็น UEFI (non CSM)
- เมื่อเช็คทุกอย่างเรียบร้อยแล้ว กดปุ่ม START ได้เลย!
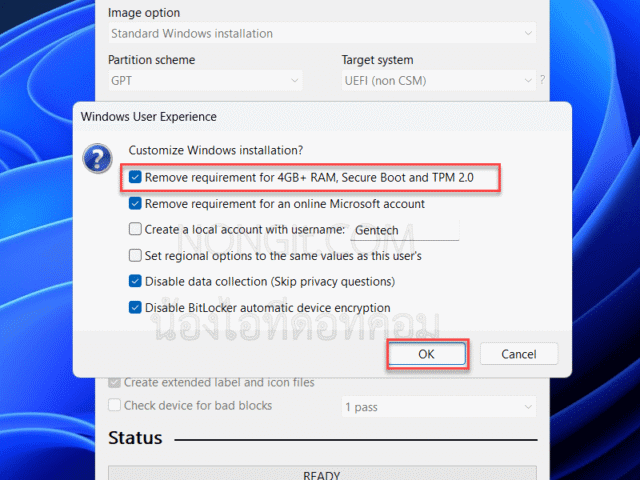
ขั้นตอนที่ 4: (สำคัญที่สุด!) ปรับแต่ง Windows Installation (Bypass TPM ตรงนี้!)
- หลังจากกด START จะมีหน้าต่าง “Windows User Experience” หรือ “Customize Windows installation?” ปรากฏขึ้นมา
- ให้เรา ติ๊กถูก (✓) ที่ตัวเลือกแรก ซึ่งเขียนว่า
Remove requirement for 4GB+ RAM, Secure Boot and TPM 2.0 - ตัวเลือกอื่นๆ ที่น่าสนใจ (เลือกได้ตามต้องการ):
Remove requirement for an online Microsoft account: ทำให้เราสามารถสร้าง Local Account ได้เลย ไม่ต้องบังคับใช้บัญชี MicrosoftDisable data collection (Skip privacy questions): ข้ามคำถามเรื่องความเป็นส่วนตัวตอนติดตั้ง
- เมื่อเลือกเสร็จแล้ว กด OK ครับ
ขั้นตอนที่ 5: รอจนเสร็จ
- จากนั้นก็แค่นั่งรอครับ Rufus จะใช้เวลาสักครู่ในการสร้าง USB ให้เรา (ความเร็วขึ้นอยู่กับคอมพิวเตอร์และ USB)
- เมื่อแถบสถานะเปลี่ยนเป็นสีเขียวเต็มและขึ้นคำว่า READY ก็เป็นอันเสร็จสิ้น กด CLOSE เพื่อปิดโปรแกรมได้เลยครับ
สรุป
เพียงเท่านี้เราก็ได้ USB สำหรับติดตั้ง Windows 11 ที่พร้อมแก้ปัญหา “ไม่มี TPM” หรือ “Secure Boot” บนคอมพิวเตอร์เครื่องเก่าแล้วครับ จะเห็นว่าโปรแกรม Rufus ทำให้เรื่องที่ดูเหมือนทางตัน กลายเป็นเรื่องง่ายในไม่กี่คลิก ตอนนี้คุณก็สามารถนำ USB อันนี้ไปบูตเพื่อติดตั้ง Windows 11 ได้เลย ขอให้สนุกกับระบบปฏิบัติการใหม่บนคอมพิวเตอร์เครื่องเดิมที่ไม่มี TPM นะครับ!
FAQ (คำถามที่พบบ่อย) – อัปเดต 2025
การทำแบบนี้ผิดกฎหมายหรือไม่?
ไม่ผิดครับ การสร้างตัวติดตั้งนี้เป็นเพียงการแก้ไขให้สามารถติดตั้งบนฮาร์ดแวร์ที่ไม่รองรับได้ แต่หลังจากติดตั้งเสร็จ คุณยังจำเป็นต้องใช้ License Key ของ Windows ที่ถูกต้องเพื่อ Activate ให้เป็นเวอร์ชันเต็มครับ
วิธีนี้จะทำให้คอมพิวเตอร์เสียหายหรือไม่?
ไม่มีความเสี่ยงใดๆ กับตัวคอมพิวเตอร์ครับ วิธีนี้เป็นเพียงการแก้ไขไฟล์ใน “ตัวติดตั้ง” เท่านั้น ไม่ได้ไปยุ่งกับฮาร์ดแวร์ของเครื่องแต่อย่างใด
ทำไมหลังจากกด START แล้วไม่มีหน้าต่าง “Customize Windows installation” ให้เลือก Bypass TPM เด้งขึ้นมา?
ปัญหานี้อาจเกิดจาก 2 สาเหตุหลักครับ
1. ใช้ Rufus เวอร์ชันเก่าเกินไป: ตรวจสอบให้แน่ใจว่าคุณใช้ Rufus เวอร์ชัน 4.0 ขึ้นไป เพราะหน้าต่างปรับแต่งนี้เป็นฟีเจอร์ของเวอร์ชันใหม่ๆ ครับ
2. ใช้ไฟล์ ISO ที่ไม่ใช่เวอร์ชันมาตรฐาน: ไฟล์ ISO บางตัวที่ถูกดัดแปลง (Modified ISO) อาจทำให้ Rufus ไม่แสดงตัวเลือกปรับแต่งนี้ขึ้นมา แนะนำให้ดาวน์โหลดไฟล์ ISO โดยตรงจาก Microsoft เพื่อความแน่นอนครับ
แล้วถ้าคอมพิวเตอร์ของฉันรองรับ TPM 2.0 อยู่แล้ว ต้องทำอย่างไร?
หากคอมพิวเตอร์ของคุณเป็นรุ่นใหม่ที่ผ่านเกณฑ์ทั้งหมด คุณไม่จำเป็นต้องใช้วิธีนี้ครับ สามารถทำตามคู่มือ วิธีลง Windows 11 ฉบับจับมือทำ ของเราได้เลย ซึ่งจะเป็นขั้นตอนมาตรฐานที่แนะนำโดย Microsoft ครับ

